Three-dimensional drawings represent objects in height, width and depth, simulating real objects. These drawings model solids, surfaces and meshes and allow the user to simulate real objects, build prototypes, perform stress analysis on structures, and simulate assembly and motion in three-dimensional space with high accuracy.
It’s important to practise the basics of two-dimensional space in order to be prepared for more complex software tools. In this sense, there are some basic tools that are considered important in this AutoCAD training course.
AutoCAD workspace settings
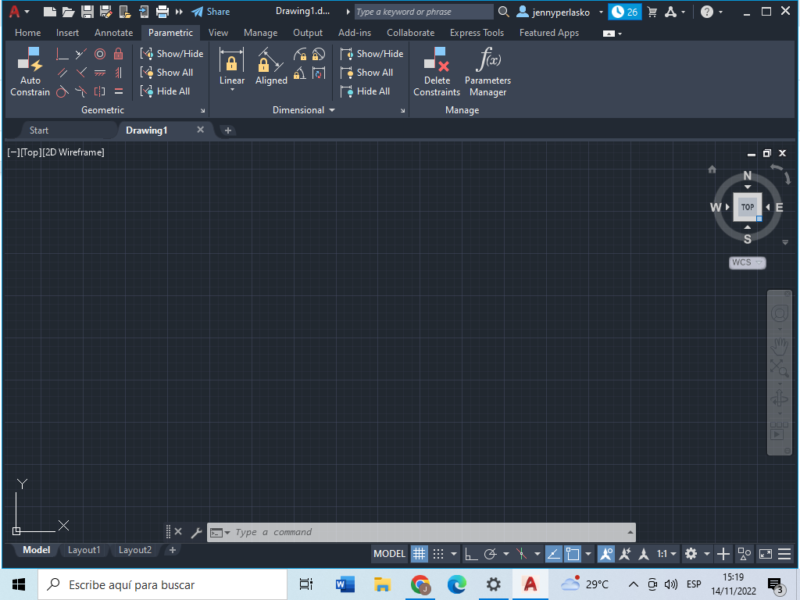
The View Cube is located in the top right corner and is set to top view by default. You can change the view from different angles by hovering your mouse over the icon. You’ll see a coordinate system in the middle of the workspace where you can click on faces, edges or corners to select the view you want.
How to use AutoCAD online is explained in this article.
Navigation orbit
This is a tool used to control the display of a view such as the ViewCube. It has a circular shape and contains cardinal points to help the user orientate the drawing. It also allows the user to orbit the drawing space or sketch in a three-dimensional space.
Setting units
Remember to always set the units before you start a sketch. Type the word UNITS in the blank space in the command bar at the bottom of the screen. You’ll see the UNITS option and a brief description of this command appear as you begin typing.
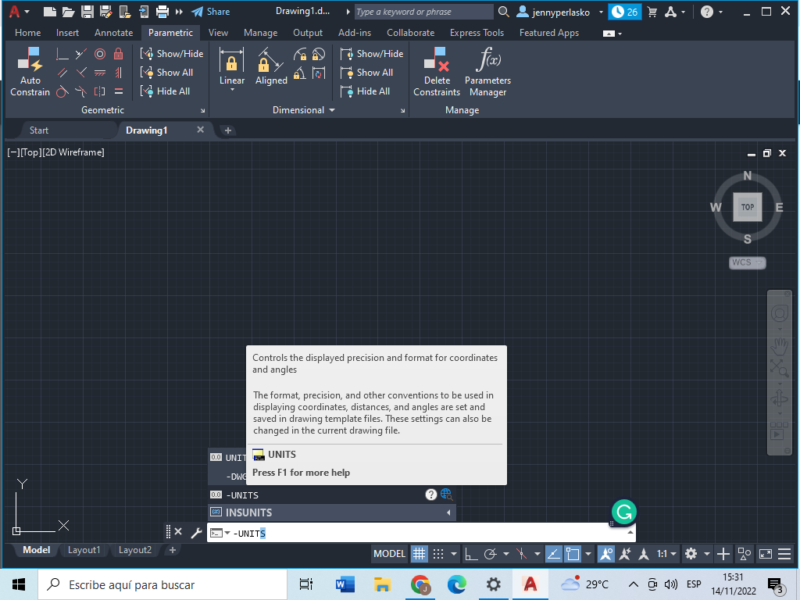
The Units you choose won’t affect the creation of objects or the precision of the drawing, but they will affect the length, angles, coordinates, and distances displayed by the program.
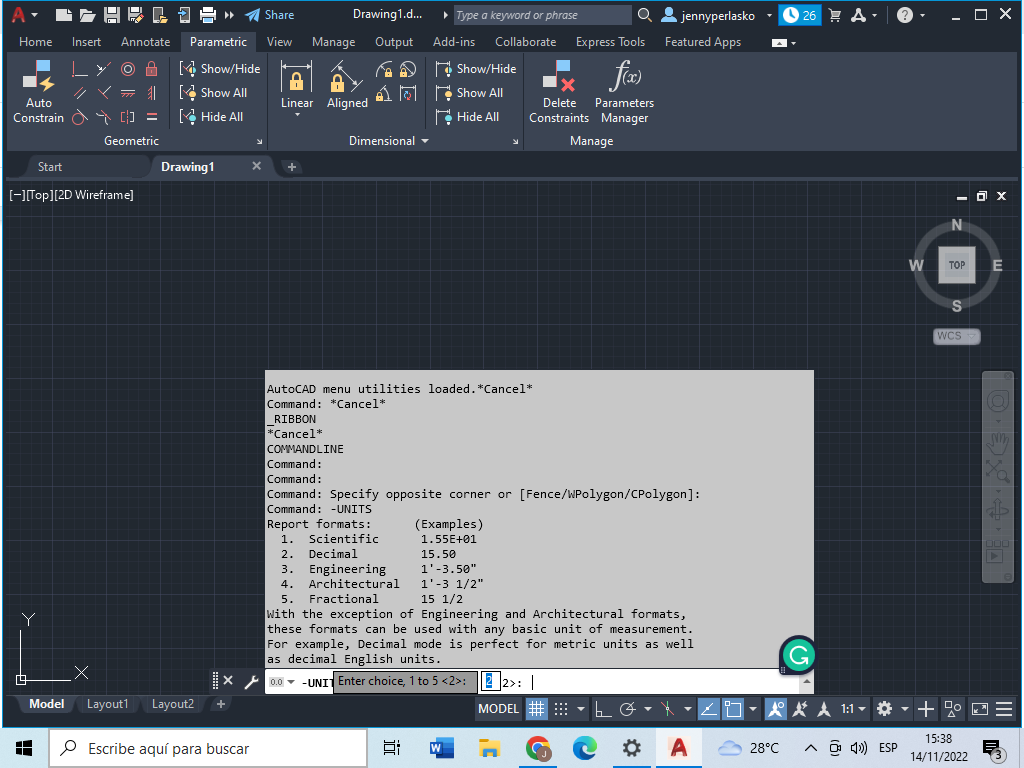
If you want to work with inches and feet, it’s best to use the Architecture option (option 4). However, if you want to use the metric system, you can select option 2 (Decimal). You can also specify the format in which the dimensions are displayed and their precision (the number of decimals displayed). The program will automatically ask for all this information and will let the user use the flashing space to enter the number of decimals and the format required. Press ENTER until the UNITS setting is complete.
Basic Operations
There are hundreds of commands available in the software that designers use to edit, modify, create and view their models. With experience and training, users can become familiar with the commands and use them effectively when drawing and sketching. Here’s a short list of commands that are useful to remember when working in both the 2D and 3D workspace:
- It manages and controls a set of scaling options in a given object of the drawing.
- MOVE: it allows users to move objects in a specified distance and direction.
- EXPLODE: It breaks a compounded object into its constituent parts
- JOIN: it joins similar objects to form a single one.
- DIM: it allows users to create annotations of diverse dimension types (lines, arcs, angles…)
- AREA: it calculates the area and perimeter of a given object.
- OOPS: it restores the last elements you deleted. It serves as a UNDO option.
- EXTEND: it is used to extend an object until it meets the edges of another one
- TR: This command is used for trimming an object.
- Allows users to erase elements in the drawing in a simple click.
- It allows the user to get back to the immediate previous step taken in the program by reestablishing the drawing to the prior condition.
- MIRROR: it mirrors the shape of an object by using symmetry. It saves lots of time especially working with symmetrical shapes.
- LA: it allows users to manage and create layers in a model.
- FILLET: it allows users to round and filet the edges of given objects.
- OFFSET: it creates concentric circles, parallel curves and lines.
Convert sketches to 3D models in AutoCAD
Here we will explain how to convert a sketch into a 3D model using AutoCAD for each CAD.
Setting the 3D basic tools
When trying to create a 3D model in AutoCAD, it is useful to customise the sketching tools. By default, the software is set up in the <<Drafting and Annotation>> environment, which shows users only 2D tools for creating sketches.
- To work in a 3D environment, click on the double arrow next to the share button located at the top bar (as shown in the picture below)
- Click on the down arrow to display a menu with the available options. You can work either in 3D basics or 3D modeling. The 3D modeling environment provides more advanced design tools to edit 3D objects, meshing, and rendering. While the 3D basics offer the basic operations to create a solid.
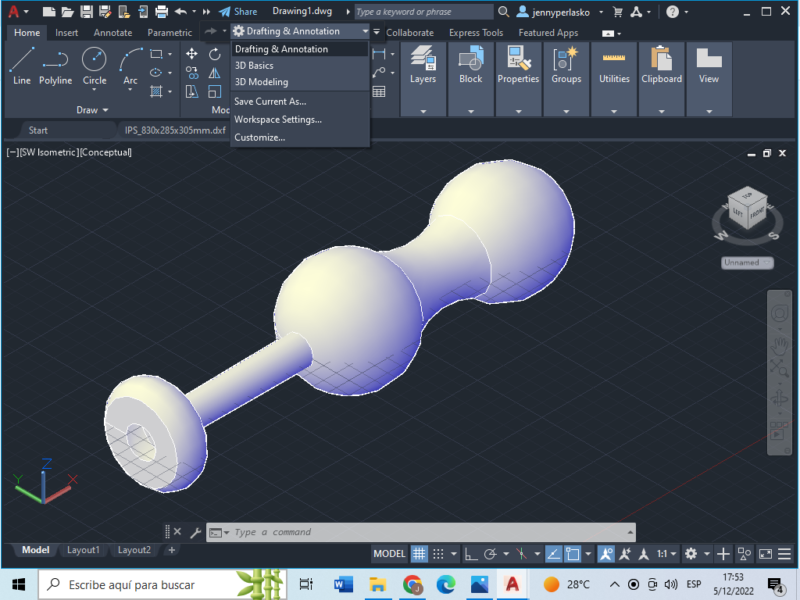
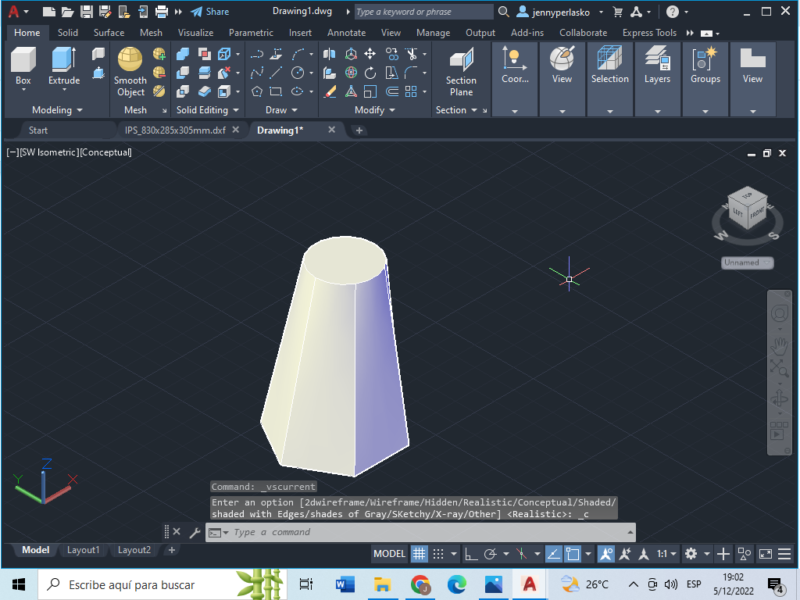
- Click on 3D basics, and you’ll see how the sketch view will turn into SW ISOMETRIC, and the objects in the working space will be CONCEPTUAL. This allows users to view the objects as solids.
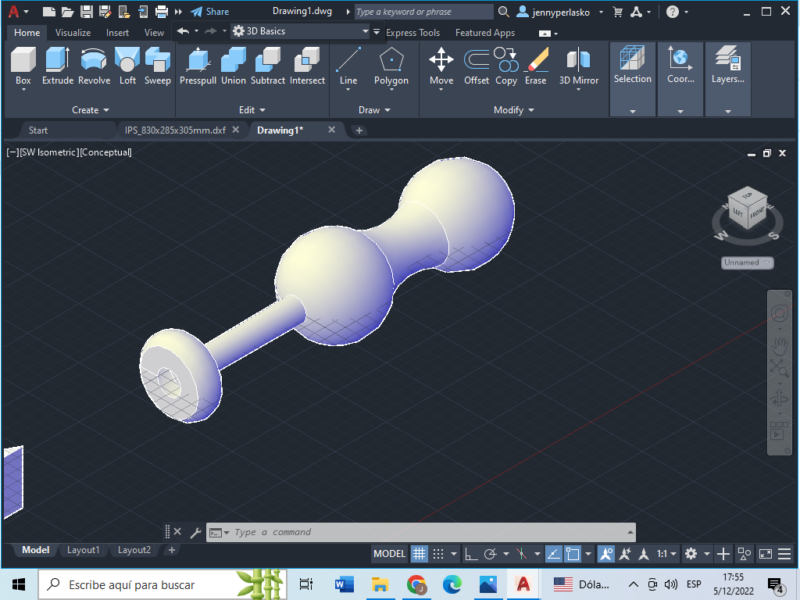
- You can customize the model view by clicking at the upper left corner in the drawing space below the toolbar to change the object’s perspective.
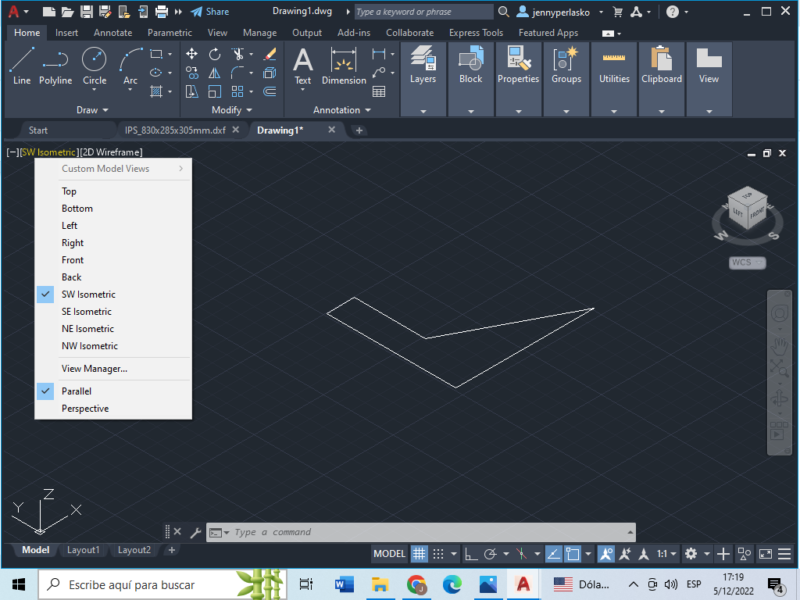
Extrude
- The extrude option allows the user to add the third dimension to a 2D drawing by providing a height perpendicular to the object.
- To select the extrude operation you can use the Extrude icon located at the toolbar at Home in the Modeling options tab. Or you can type in the word extrude in the command bar below as you can see in the image below.
- Then select the flat object (2D drawing) you want to extrude and press <<ENTER>>.
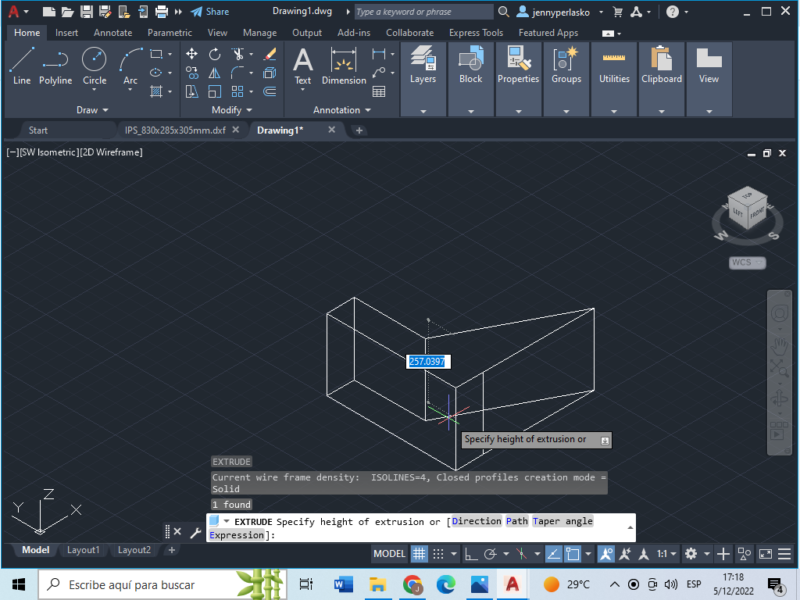
- Immediately a dialog box will appear for you to enter the height of the body (it can be positive or negative depending on the axis). You can also use the mouse to establish the height. Then press <<ENTER>>
- You can customize the visual style of the model by clicking at the upper left corner in the drawing space below the toolbar to change the object’s perspective (2D wireframe, conceptual, realistic, etc).
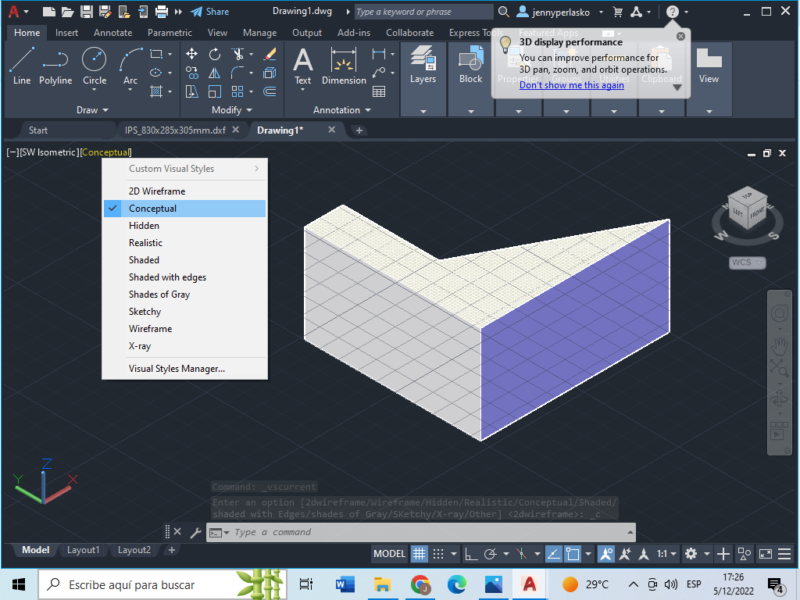
Revolve
- The revolve operation involves spinning an object through a specified axis enclosed by a 2D figure to create a symmetrical 3D model.
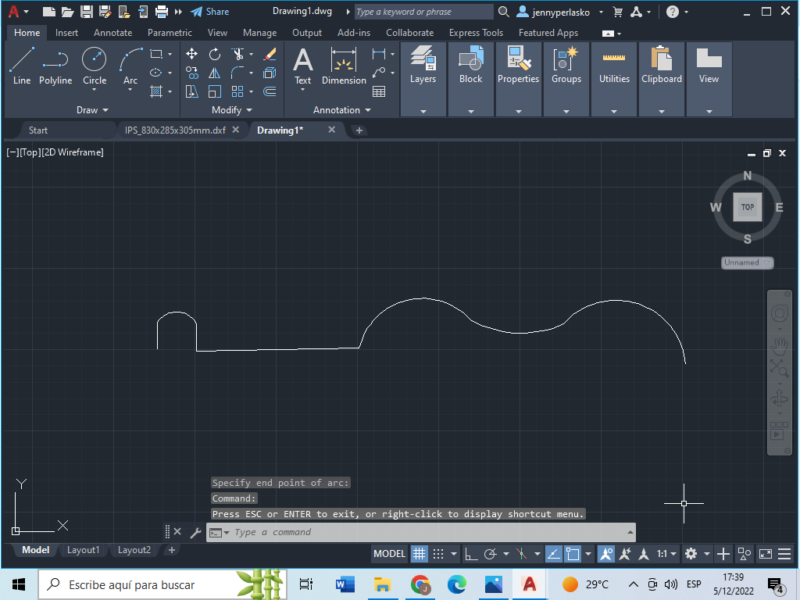
- The first step is creating the shape of the object you want to revolve through a polyline or straight-line figure as shown in the figure below.
- The line or shape should be open and joined as seen in the picture below to revolve it.
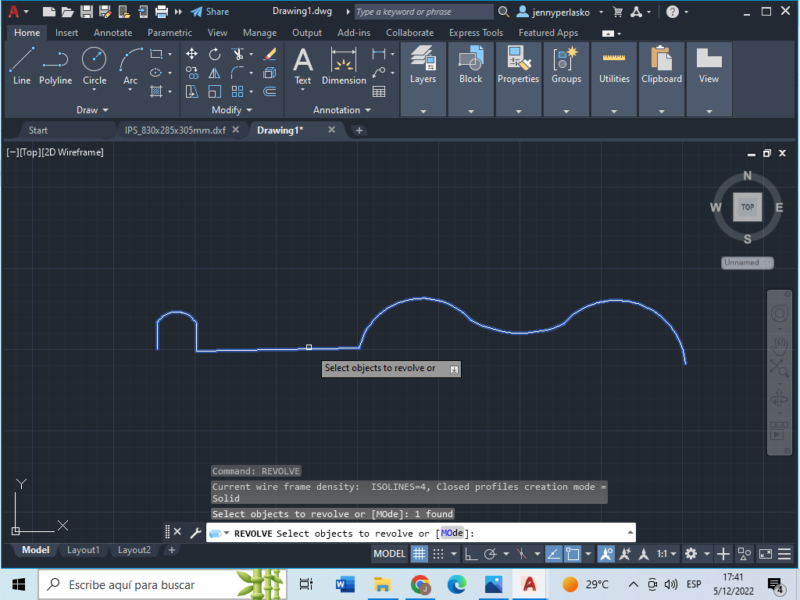
- Write down in the command bar the word <<REVOLVE>> and press <<ENTER>>
- Then click on the object you want to revolve (as shown in the picture below) and press <<ENTER>>
- Indicate the axis of rotation from the initial point to the end by clicking in the working space. The rotation axis doesn’t necessarily need to meet the shape’s endpoints, you can place it at any point in the drawing space. Then press <<ENTER>> .
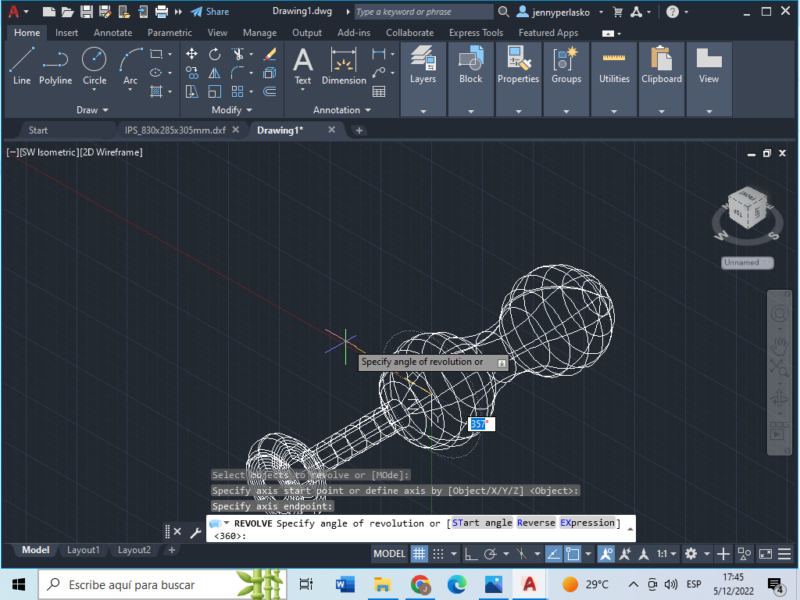
- Immediately a dialog box will appear for you to enter the revolution or spinning angle from 0 to 360 degrees. You can also use the mouse to establish the angle. Then press <<ENTER>>
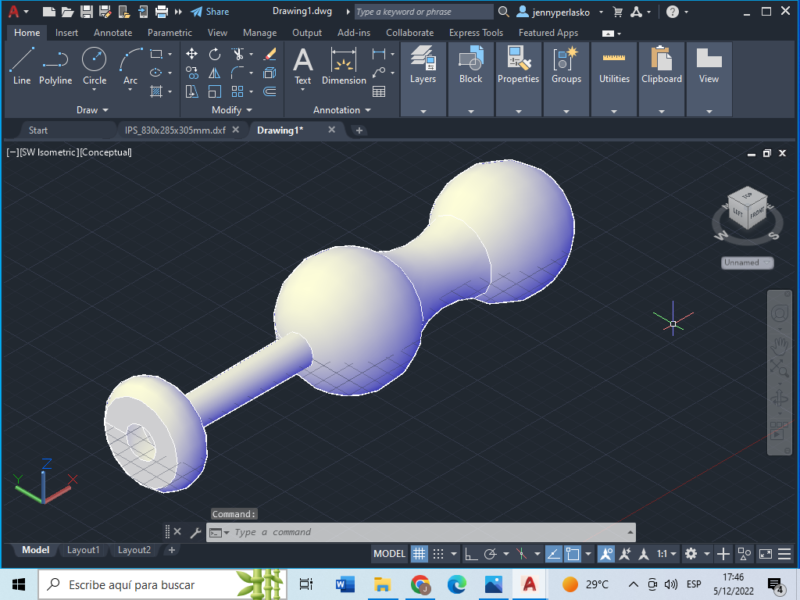
- The revolved object will immediately appear as a conceptual body.
Loft
The Loft operation allows the user to join two 2D shapes and create a 3D model or surface within the space that separates the two (or more) 2D shapes. This operation is similar to Extruding, but in this case the solid is created between two different cross-sections.
- To use the loft operation, you need to have at least two 2D enclosed objects separated from one other in the axis perpendicular to the objects (in this case the Z axis).
- You can verify the location of objects in the drawing by switching the Model View and making sure both are in the same plane (in this case, the Top view would show both objects separated vertically)
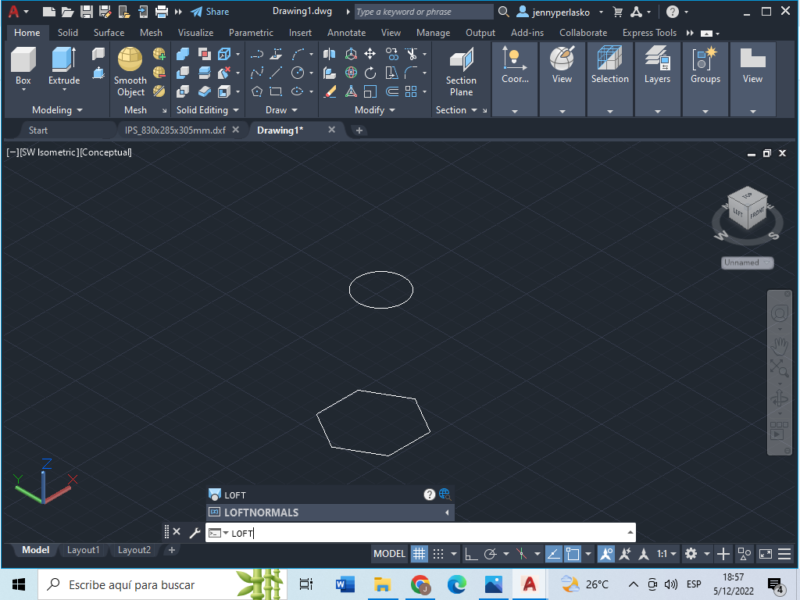
- Then use the Command bar to type in the word LOFT and press <<ENTER>> or access the <<Modeling>> tab and search for the LOFT icon.
- Then select the two desired objects (one after the other) and a coordinate system will appear on top of the cursor to indicate where the loft operation will occur. Then press <<ENTER>>
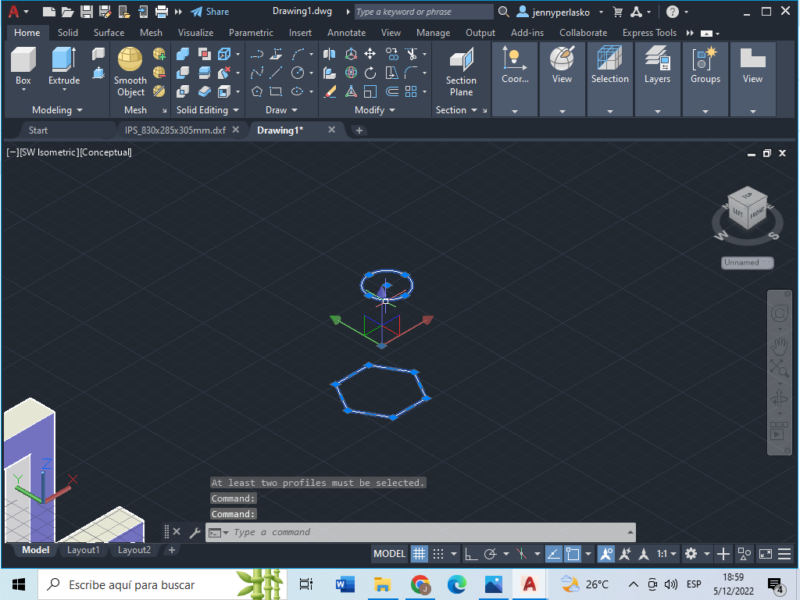
- Finally, a solid will appear in a conceptual view (as shown in the picture below). You can always change the solid’s view by customizing the visual style at the top left corner.

Sweep
This operation is useful to represent pipes and circuits based on an open or closed 2D path and a cross-section
- The first step is creating the open or closed path you want to sweep through by creating a polyline or straight-line figure as shown in the picture below.
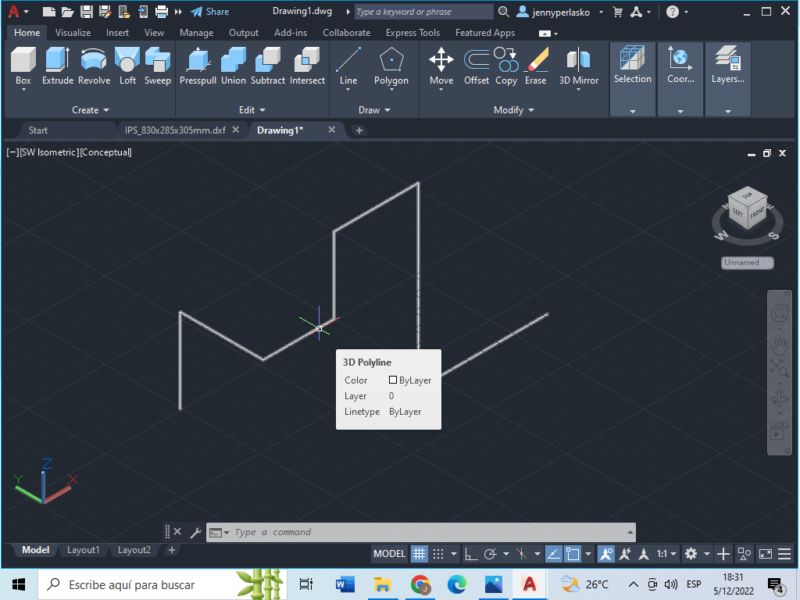
- Then create the cross-section meeting the endpoint of the path and the center of the cross-section perpendicular to the path’s plane.
- You can verify the location of objects in the drawing by switching the Model View and making sure the cross-section is perpendicular to the 2D path. (In this case, the Top view model will face the cross-section).
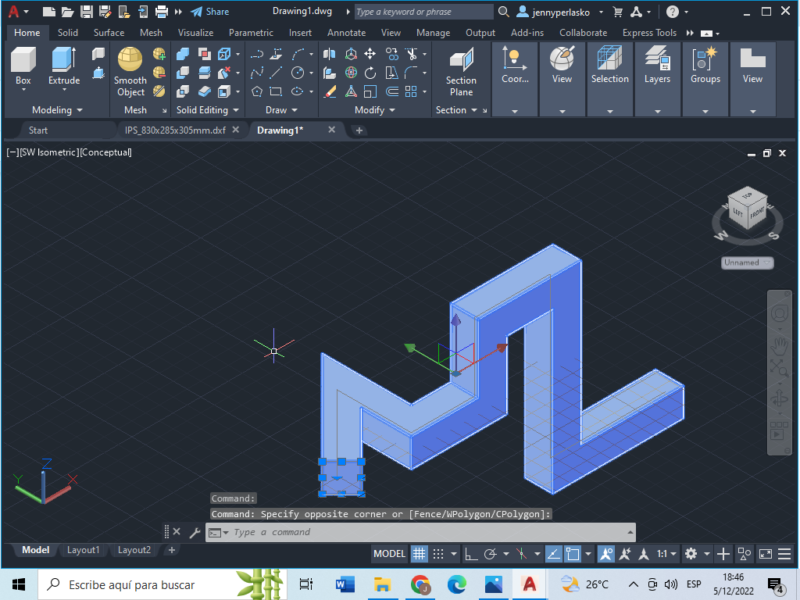
- Then use the command bar to type in the word <<SWEEP>> and press <<ENTER>> or use the <<Modeling>> tab and click on the Sweep icon.
- Select the cross section and press <<ENTER>>
- Select the path (the 2D polyline) and press <<ENTER>>
- Immediately the solid will appear in a conceptual view as shown in the picture below.
Shell
This operation transforms a 3D solid into a hollow shell with a wall of the desired thickness. This is a 3D Modify operation available from the 3D modelling environment toolbar.
- Simply click on the SHELL icon or type in the word <<SHELL>> on the command bar and press <<ENTER>> to use this operation.
- Then click on the solid you want a shell and the faces (two or more) in where the shell will be and press <<ENTER>>
- Then a dialog box will appear for you to enter the width or thickness of the shell, then press <<ENTER>>
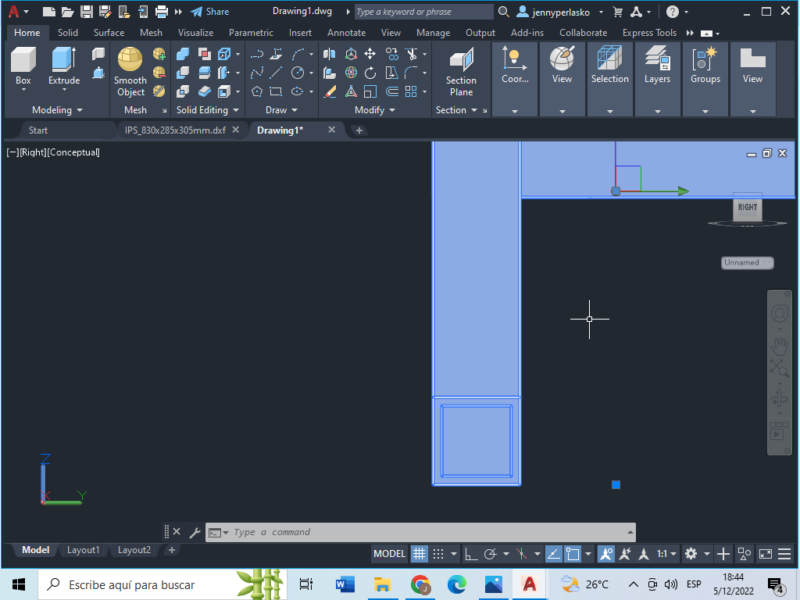
- The shelled body should appear immediately on the screen as a conceptual model.
Assembly work in AutoCAD
Assembly work using AutoCAD is also a very important skill. I will explain it in detail here as well with pictures.
JOIN
The Join tool allows you to combine two or more open or closed shapes to create a single object with common end points. This tool is essential for creating assemblies and can be found in both 2D and 3D environments.
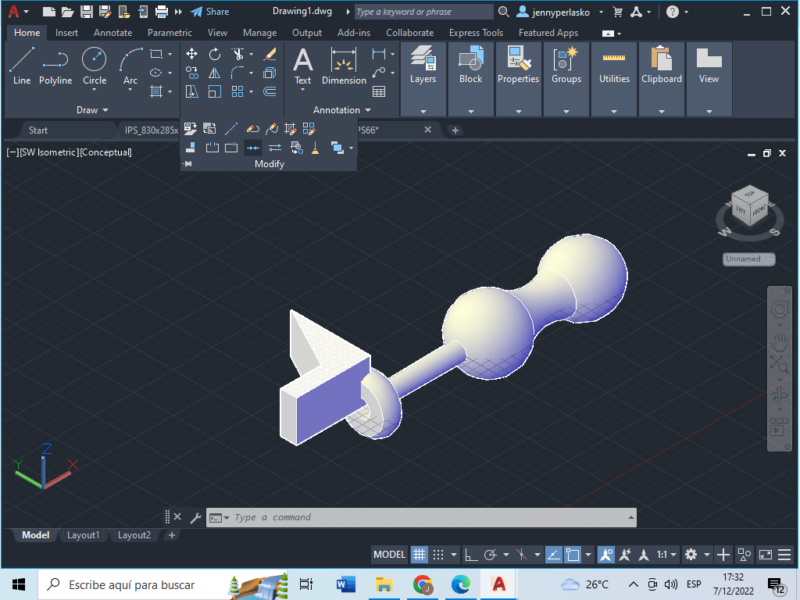
You’ll find the JOIN tool in the <<Modify>> (see the picture below), or by typing in the word <<JOIN>> in the command bar below.
MOVE
The Move tool allows the user to move objects around the workspace regardless of the original coordinates of the object. This tool is also essential for creating assemblies and can be found in the 2D environment (Drafting and Annotations) as a cross-arrow icon on the <<Modify>> tab and in the 3D environment (3D Modelling) as MOVE 3D as a cross-arrow with a coordinate systems icon next to it.
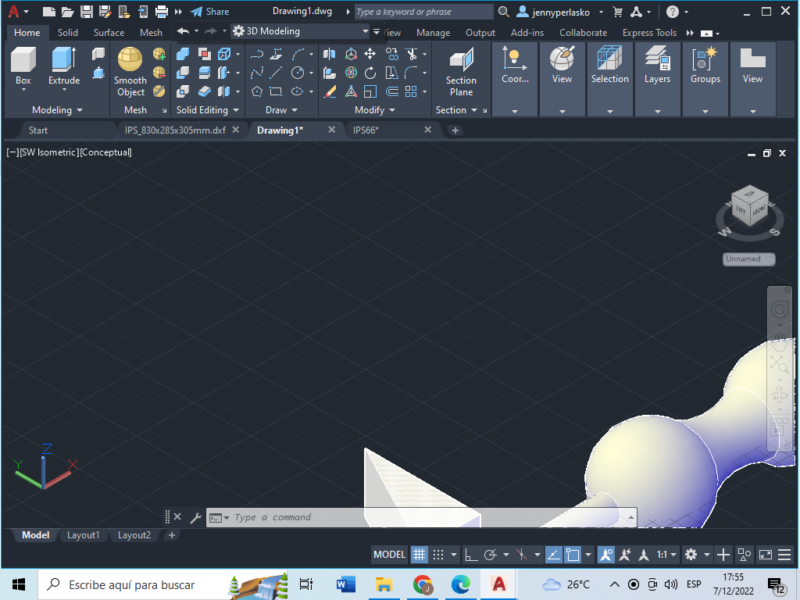
You can also access this command by simply typing in the word <<MOVE>> in the command bar below and clicking on the desired option depending on the environment you’re working in (2D or 3D).
ROTATE
The rotate tool allows users to rotate a solid or surface around a base point or given axis of rotation to change the original position of the object.
This tool also assists designers in the assembly process and can be found in the 3D environment (3D modelling) on the <<Modify>> tab, as shown in the image below.
- You can also access this command by simply typing in the word <<ROTATE>> in the command bar below and clicking on <<ROTATE 3D>> and pressing <<ENTER>>.
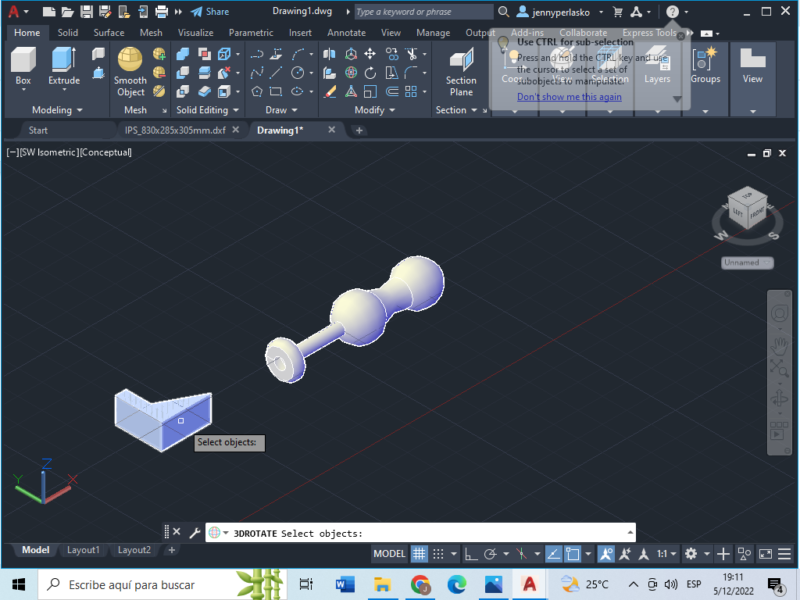
- Click on the object you want to rotate and press <<ENTER>>
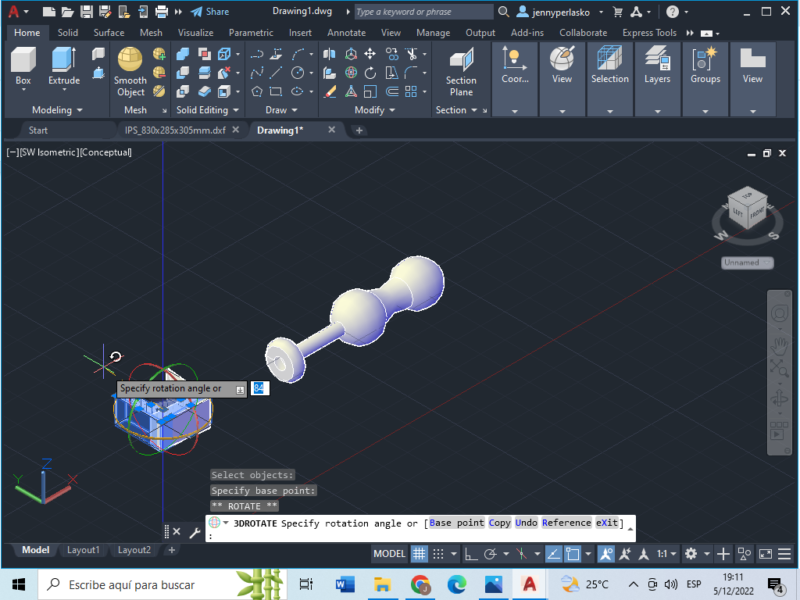
- Then an atom-shaped icon will appear on top of the cursor displaying the three axes (x,y,z). Click on the axis you want to fix to rotate the object. For this, you need to apply spatial orientation skills.
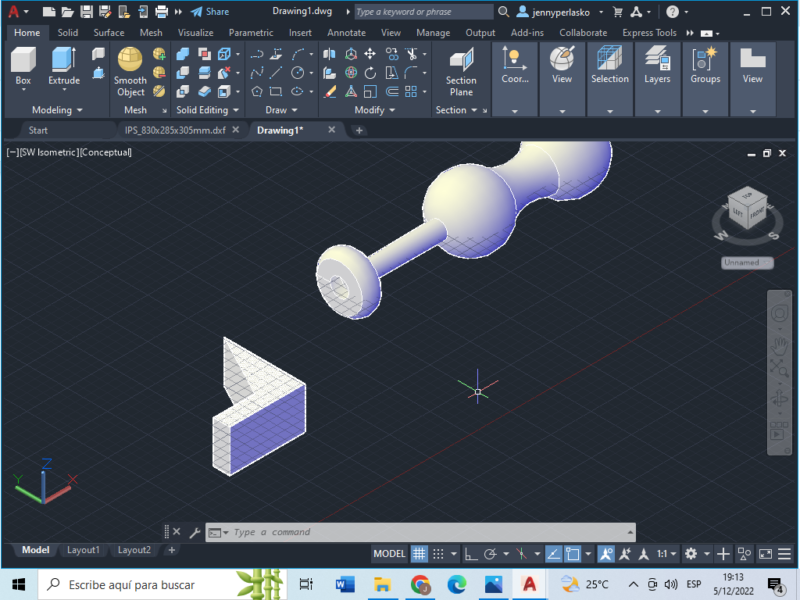
- Then a dialog box will appear for you to enter the angle of rotation (from 0 to 360 degrees), then press <<ENTER>>.
- When you are done rotating the object press the command key <<SCAPE>>.
Do you have no idea how to operate AutoCAD?
If you don’t know anything, we recommend you take an AutoCAD course first.
If you want to understand AutoCAD operations in an easy to understand way with videos, please read this article.
For those wanting to master AutoCAD in a short time, the following online training courses are recommended: in two days you will acquire the AutoCAD skills required to use AutoCAD in practice.
Conclusion
When it comes to AutoCAD training, there are many techniques you need to master. It’s a good idea to think about what kind of design you want to create and start with a sketch. If you get stuck, check out this article to see what techniques are available.

