Scaling objects and dimensions is a basic need for professionals, engineers, and designers when working on any design. In this sense, AutoCAD is a highly versatile software that offers assistance to professionals in different fields of study, that contains a complete Scale tool to represent, develop and manage drawings properly. In order to learn how to Scale in AutoCAD you need to be aware of the basics of the Scaling process.
What is a Scale?
For design purposes, a scale is a set of numbers used to measure or compare the dimensions of a real object represented in drawings.
A scaled drawing refers to a graphic representation of an object in which each dimension is enlarged or reduced in a given proportion (scale). The scale remains the same for all the dimensions. A scaled drawing helps understand the details of an object in terms of length, width, height, and spatial relations.
In this sense, a scale is a ratio (a proportion) that can be classified into three different types: scale-up (enlargement), scale-down (reduction), or full-size scale (same as the real-life dimensions).
Notation of scales
The scale is represented by a number for the dimensions in the drawing, followed by a number representing the real dimensions of it. Both numbers are separated by a colon (“:”). To simplify calculations, one of the two numbers (left or right) is equal to 1 (depending on the type of scale).
Examples
- Reduction scale: 1:200 means that for every 200 units in the real world, there is 1 unit in the drawing.
- Enlargement scale: 2:1 means that for every unit in the real world, there are 2 units in the drawing.
- Full-size scale: 1:1 means that the dimensions in the drawing are one-to-one to the real-world object.
Importance of scaling your drawing
Scaling is essential to represent objects and spaces accurately, and using the appropriate scale is key to understanding the dimensions of a drawing. Scales are the starting point for designers to set up a map or a plan for a new or existing drawing. From architectonic representations to mechanical pieces, industrial objects, even artistic representations use scales to illustrate a given object with appropriate dimensions and proportions.
How to calculate drawing scale in AutoCAD
The scale factor or ratio is determined by a simple relation or formula:
Scale factor = new dimension / real dimension
If the scale factor is greater than 1, then it’s an up-scale (S>1).
If the scale factor is smaller than 1, then it’s a down-scale (S<1).
If the scale factor is equal to 1, then it’s a full size-scale (S=1).
The following articles also provide detailed information on how to calculate and set scale factors in AutoCAD.
Methods for SCALING a drawing in AutoCAD in the MODELING section
We will explain how to scale drawings in AutoCAD in the “Modeling” section.
The scaling factor
When the scale is given, or the ratio can be easily calculated (for example 1:2, 1:5, 3:1), then the simplest way to do it is by typing the scale factor. To do that in AutoCAD, you must follow these steps:
- Select the object(s) you wish to scale
- Type SCALE in the command bar and hit Enter.
- Select a base point for your object.
- Type the SCALE factor and hit enter. If the number is between 0 and 1, it means you’ll be scaling down. If the number is greater than 1, you’ll be scaling up.
Using a reference figure
Sometimes the designer may not know the scale factor or the result of its calculation is a continuous number (1.345876….) instead of an integer. In this case, the designer may know the proportional size of the object or drawing compared to others. Other objects can be drawings within the model space and images.
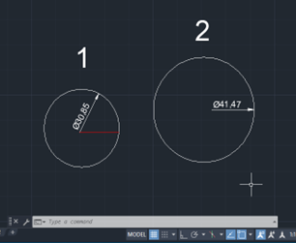
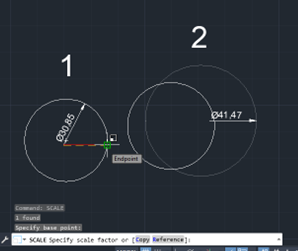
- Let’s see this with an example. Figure 1 is the reference object, and figure 2 is the one we want to scale. To scale fig. 1 to the size of Fig. 2. First, draw a radius line from the center of Fig1 to the edge of the circle. (see red line)
- Select figure 2, type SCALE, and hit Enter.
- Click on the center point of Fig 1, this will be your base point.
- Click the end of the radius line, this will be your scale factor.
- Press enter, and now the circles should have the same size.
Methods for SCALING a drawing in AutoCAD in the LAYOUT section
Let’s take a closer look at how to scale a drawing in the Layout section of AutoCAD.
Using the viewport
Viewports are windows created on the layout section that serves as close-ups of the drawing created in the Model section. A model can contain multiple drawings that may not fit on one paper sheet. Thus, the designer can choose to create scaled viewports to fit into a paper size to display what is particularly important for them. This makes this method a great choice to work with different scales on the same paper sheet without affecting the original drawing.
Note that this scale is completely different from the Model scale that uses actual dimensions and units (mm, in, cm, m). Unless the scale in viewports shows as “paper unit: drawing unit” then they are the same. Otherwise, if the scale in the viewport shows 1:2, this means that 1 inch on paper will represent 2 inches on the drawing. To scale a viewport in the Layout section, you must follow these steps:
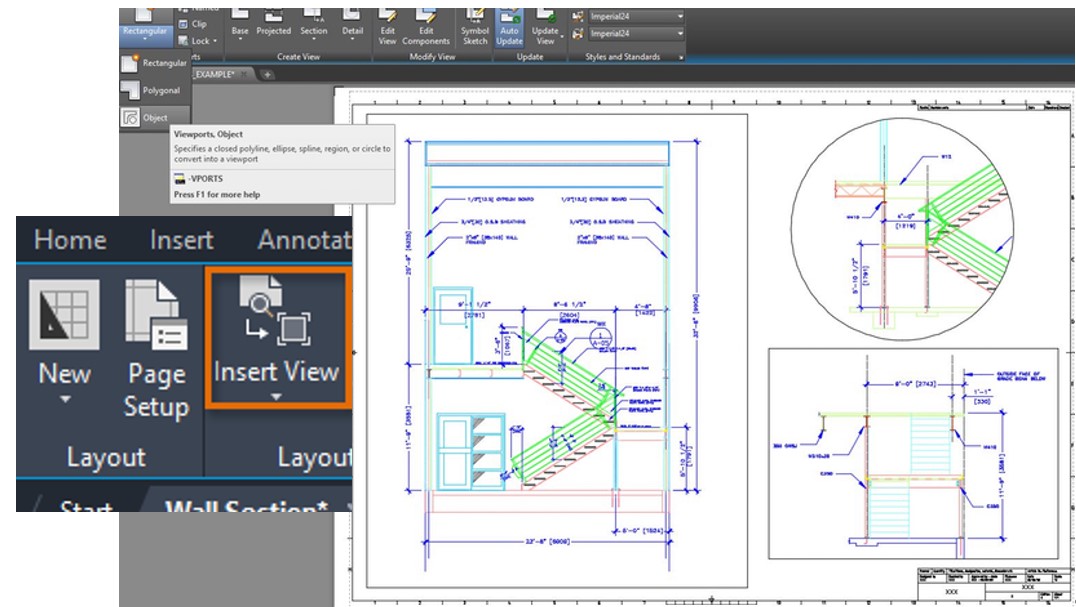
- Set up a new layout space by clicking the “Page Setup” function.
- Using the -VPORT command, create the viewports in the layout space.
- Select any viewport, and the scale will be visible in the status bar.
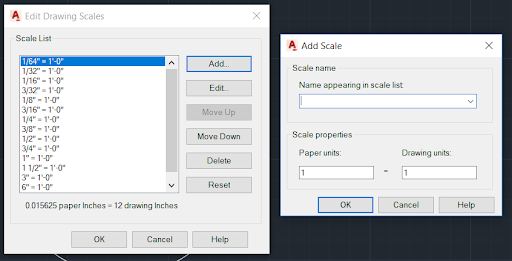
- Choose the appropriate scale for your viewport from the available scales.
- If the scale size you need is not in the list of available scales, select the custom option and add a custom scale.
- Once the viewport is scaled, lock the viewport to work in the sheet without any misalignment issues.
Annotative Scaling
This method allows us to ensure that all of the features on a drawing have a proportional scale. This means that when we scale an object its annotation and text will change accordingly in the Viewport. Annotative scaling also allows all annotative texts, dimensions, and blocks to change to reflect the scale. It is a highly versatile option since it can show multiple scales in the same drawing and be set independently for each viewport.
Annotation Visibility
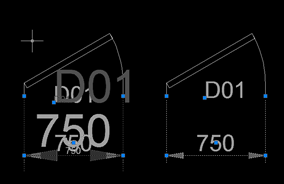
Through this command, you can choose to show all the scales in the drawing or just the current scale of an object.
In the figure above, it shows the Annotation Visibility turned ON on the left side, contrasted by the Annotation Visibility turned OFF on the right side.
To have an Annotative scale in your texts and dimensions you must change you must follow these steps:
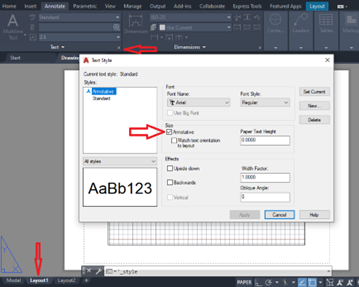
- Click on the Text Style Manager from the Annotate Ribbon and click on the Text Style, followed by clicking Edit Text Styles.
- Now that you can see the Text Style Manager window look for the option “Size” and mark the checkbox called Annotative. Now you will have your Paper Text Height multiplied by your scale factor of the viewport.
- Click on the Dimension panel dropdown options and the Dimension Style Manager dialog box will pop up.
- Select the dimension style you wish to edit and click Modify.
- Look for the Fit tab, then click the Annotative checkbox that appears below. Now all your dimension text height and arrows will be multiplied by your selected scale factor of the viewport.
The instructions explained above are the most common tools that AutoCAD designers use to scale their drawings. There are many other ways to approach scales in AutoCAD. Hopefully, you find this basic guide helpful.
AutoCAD Online Training Course

There are so many e-learning opportunities and online training courses available it can be so difficult to know where to start. There are courses set up for people who have little to no AutoCAD experience all the way to courses that are suited to people who are very familiar with AutoCAD but need to know about the more advanced features of this highly sophisticated software. Knowing what to choose in order to improve your skills and not waste your money can be difficult with all these options on offer. Sometimes it can feel extremely difficult to choose, especially when you are only just starting your AutoCAD journey. Don’t lose hope just yet.
If you are just starting your AutoCAD journey, and looking for a top-quality beginner’s guide to AutoCAD. Look no further than CADLab’s very own “Beginners AutoCAD Online Course”. This course has been developed over time and designed to cater for people with little to no knowledge of AutoCAD and are looking to get you up to speed and interested in this incredibly comprehensive program.
On this course you will learn to use AutoCAD’s user-friendly interface as well as a whole host of important features within the program. Learning these interfaces and features will ive you an edge in the competitive world we live in today.
Listed below you will find a breakdown of everything you will learn on this course:
- AutoCAD screen operations and initial settings
- Create objects (line segments, circles, arcs, polylines, rectangles, centerlines, etc.)
- Select objects (basic, quick selection, similar selection)
- Using drawing aids (grid and snap, object snap tracking, etc.)
- Editing objects (move, offset, rotate, trim, fillet, stretch, etc.)
- Layers and properties (layer settings, object properties)
- Reusing content (shapes) (block definition, placement, editing, attribute definition)
- Annotative text (text entry, multi-text, editing, styling)
- Annotative dimensions (fills, multileader, edit, style settings)
- Annotative hatches (create, edit)
- Layout usage (page setup, create viewport, control panel)
- Annotative scaling (settings)
- Drawing comparison functions
- Templates (create drawing templates)
- Data management and utilization (external referencing, linking DWG files)
All of these tools are laid out and explained in an easy-to-understand manor and at a pace that is not too fast for you to understand.
Want to know how to apply for the course provided by CADLab? Simply, open the link provided and you will be guided to the webpage that will give you a breakdown of the course and an easy 3 step purchasing method.