
Within the past few decades, CAD software has transformed and revolutionized industries that rely on technical 2D and 3D drawings. AutoCAD has continued to maintain its place as a leader in CAD solutions because of its efficiency, accuracy, versatility, and wide range of applications. In this article, we will take a closer look at what AutoCAD is and cover the basics you need to know before trying it out.
- 1 What is AutoCAD?
- 2 A Brief History of AutoCAD
- 3 What is AutoCAD Used For?
- 4 Pros and Cons of AutoCAD
- 5 How Much Does AutoCAD Cost?
- 6 AutoCAD System Requirements
- 7 Standard Installation Process from an Autodesk Account
- 8 Autodesk Free Education Plan License
- 9 Understanding the Basics of AutoCAD
- 10 Let’s try AutoCAD once
What is AutoCAD?
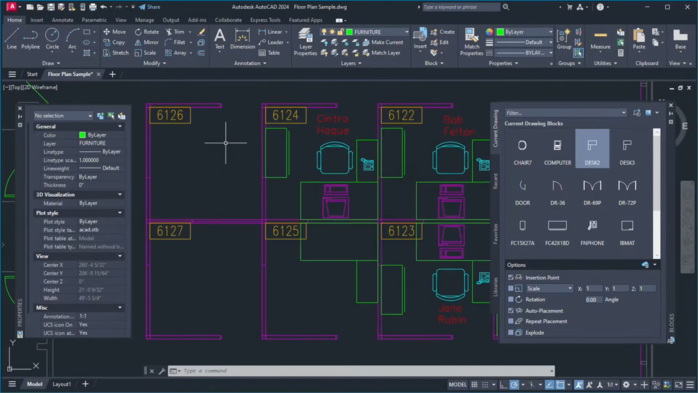
AutoCAD is a software package primarily used for 2D drafting that was developed in the 1980s as a design solution for architects and engineers. It has since become popular across a variety of industries, including construction and interior design. The software enables the creation of detailed drawings of buildings, objects, landscapes, circuits, house plans, and layouts, eliminating the need for hand-drawn designs.
A Brief History of AutoCAD
In 1979, AutoCAD was first released under the name of Interact CAD by Autodesk’s co-founder Michael Riddle, which was one of the first commercial software to digitize drawings. Three years later, Interact CAD was sold to Autodesk founder John Walker, who relaunched it in 1982 under the name AutoCAD.
Thanks to Autodesk’s decision to expand its programming environments and operating systems, AutoCAD became the leading CAD program for 2D designs in various industries, including architecture, civil engineering, and manufacturing.
Autodesk’s strategic acquisitions and partnerships allowed the company to develop a diverse range of software applications, such as Civil 3D, Inventor, Revit, Fusion 360, and Maya.
Over the years, Autodesk created several AutoCAD variants, included AutoCAD LT, AutoCAD web, and student versions to increase the software’s versatility and to provide users with more accessible versions. These variants offer users affordable options to access basic AutoCAD tools and create, edit, and modify drawings with limited packages and options. They cater to a vast community of designers, especially students and those in entry-level stages of their careers.
What is AutoCAD Used For?
AutoCAD is a versatile software tool used by professionals in the fields of engineering, architecture, graphic design, and interior design. Depending on the specialty, designers may focus on 2D modeling (such as architects and civil engineers), or on renderings and 3D modeling (such as product designers and artists). AutoCAD offers a wide range of tools for developing drawings and sketches to the specific requirements of each field.
2D Design
Two-dimensional drawings display the length and height of objects on a flat surface without depth. Understanding 2D drawing often requires a basic technical understanding to interpret dimensions, spaces, and scales.
2D drawings are used for floor plans, sections, electrical and piping circuits, and are measured in square units (such as cm2 or inch2). They use geometric elements like points, lines, circles, and arcs. The software allows users to view drawings from all angles and axes and offers different types of annotations, tables, and lists.
3D Design
Three-dimensional drawings simulate real-life objects by portraying them in terms of their height, width, and depth. This allows beginners to create drawings intuitively, as this is how humans perceive objects in real life.
3D modeling can be used to create solids, surfaces, and mesh objects, and can facilitate users in simulating real-life objects, building prototypes, carrying out stress analysis on structures, and simulating assemblies and motion in a three-dimensional space. Measurements in 3D space are taken in cubic units such as cm3 or inch3, and figures such as spheres, cylinders, and cones are used in drawings.
The software allows users to view 3D drawings from all angles and axes and offers different types of annotations, tables, and lists. Unlike 2D spaces, 3D design includes parametric design, which saves designers time and reduces their workload.
Pros and Cons of AutoCAD
Advantages and disadvantages of AutoCAD include:
AutoCAD Pros
- Increases accuracy and efficiency in the design-making processes, saving time for designers through automated options.
- Offers both 2D and 3D options to create highly versatile drawings.
- User-friendly interface with a variety of drafting tools to create any shape, including pre-designed shapes, symbols, surfaces, textures, lines, etc.
- Useful in many industries and fields.
- File format versatility. AutoCAD allows conversion of DWG to other design software formats, even outside Autodesk.
- Offers highly professional outcomes with the ability to redesign, modify, duplicate, and export drawings in different formats with accurate measures and details.
- Safe and secure sharing and annotation of drawings, including mobile and web versions.
AutoCAD Cons
- Expensive start-up costs, including the annual license and hardware requirements, such as a computer with a strong processor and, in some cases, a graphics card to improve render efficiency.
- Training courses can be expensive, and proper training is necessary to use AutoCAD effectively.
- The many options available for plotting a drawing can be overwhelming for a new user.
- AutoCAD’s library has fewer colors and textures compared to other design tools like Adobe Illustrator.
- Limited support for importing and exporting different file types.
How Much Does AutoCAD Cost?
| License Type | Duration | Price |
| Monthly | 1 month | $245 |
| Annual | 1 year | $1,955 |
| Triennial | 3 years | $5,865 |
| 100 Tokens | 7 tokens a day (good for 14 days over 1 year) | $300 |
| 500 Tokens | 7 tokens a day (good for 71 days over 1 year) | $1,500 |
Autodesk offers several versions of AutoCAD, and below is the pricing for the standard version. If you’re a student or educator, you may qualify for a one-year free subscription. Also, be sure to take advantage of AutoCAD’s 30-day free trial. (Note: The listed prices are accurate as of the time of writing this article.)
AutoCAD System Requirements
Before installing AutoCAD software, it’s essential to check if your computer meets the system requirements. These requirements vary depending on the version of the program, which is updated every 1 to 2 years. The following are the requirements for Autodesk’s latest version of AutoCAD (2023).
| Operating System | Windows 10, 11 MacOS (v10.14 to v12)Linux |
| Processor | Basic: 2.5–2.9 GHz processor
Recommended: 3+ GHz processor |
| RAM | 8 GB (16 GB recommended) |
| Display Resolution | Conventional Displays:
1920 x 1080 with True Color High Resolution & 4K Displays: Resolutions up to 3840 x 2160 |
| Disk Space | 10 GB |
Standard Installation Process from an Autodesk Account
These are the instructions given by Autodesk’s official website, intended for new users of AutoCAD who want to install the software for the first time.
- If you don’t have an account yet, go to https://accounts.autodesk.com and click on “Create account”.
- Sign in to your account at manage.autodesk.com.
- From the All Products and Services tab in Account, select a product and download method (see Download methods).
- If you choose the Download method, run the EXE file (Windows), mount the DMG file (macOS), or extract the TAR file (Linux) associated with your product and version.
- Read and accept the license agreement.
- Click Install.
- If you see a Product Language drop-down menu, choose the language that the user speaks. (If you don’t see a Product Language menu, you can download and install a language pack after the product is installed.)
- Optionally, replace the default installation path with a new one if the option is available.
- When installation is complete, close the installer or start the program.
Autodesk Free Education Plan License
Autodesk provides free access to its eligible software, including AutoCAD, to students and teachers who become part of the Autodesk Education Community. This is a one-year license that can be renewed under certain criteria.
The company aims to extend access to Autodesk products for students to help them acquire the necessary skills or to use them as teaching tools in education institutions.
To obtain the AutoCAD Free Education License, follow these steps.
- Be enrolled in a qualifying educational institution, such as a college or university.
- Provide evidence of enrollment in a qualifying educational institution such as an acceptance letter issued by the university, student ID, or any formal documentation that proves you are currently a student or teacher.
- Create an Autodesk account through the Autodesk portal at https://accounts.autodesk.com/register and follow the subscription instructions (remember to have documentation from Step 2 at hand to complete this process).
- Wait for the Autodesk verification system to approve you as a student or teacher user (it can take 7 to 14 days).
- Use your login information to access the Autodesk website and click on Products > Top Products > AutoCAD, and then click on “Get Started”. Select the version you want to install (keeping in mind the computer model and the operating system you’re using)
- Follow the instructions to install the AutoCAD software on your computer (just like you would do with the paid license).
Understanding the Basics of AutoCAD
This section explains various AutoCAD operations.
Files Types
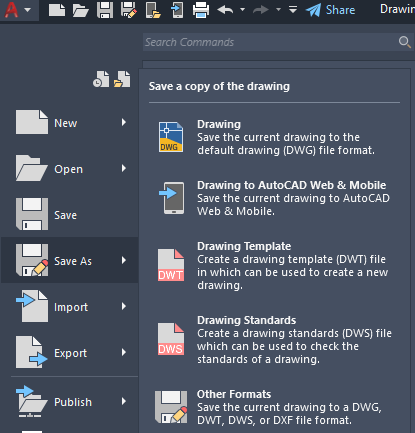
AutoCAD uses its own file type, DWG, which contains all the drawings’ information. Users can also export file types such as DXF to Adobe PDF, Adobe Illustrator, or CorelDRAW.
Blocks and Libraries
Blocks are pre-designed figures or shapes that can help users reduce drawing time for repetitive objects. They are generally used in industrial fields (like architecture and civil engineering) to maintain a normalized format in drawings in terms of presentation and sequence. Libraries are virtual spaces where these figures and shapes are stored and classified for easy access.
Differences Between Model Space and Layout Space
AutoCAD offers two distinct environments for drawing: MODEL space and LAYOUT space. Users can select one of these environments by clicking the bottom tab, located in the left corner of the drawing space, when opening any AutoCAD file.
Model Space: This space is where users can create objects and shapes they want to represent, such as doors, walls, mechanical pieces, geometrical shapes, etc. This is the place where drawings come to life, and could be either two-dimensional or three-dimensional entities.
Layout space: Also known as PAPER space, this environment is where users find information that only exists on paper, including annotations, dimensions, titles, blocks, etc. Each drawing can have multiple layout spaces, depending on the user’s need to annotate or add information about the model, and each space can have its window stored separately. However, there’s only one model space for each draft.
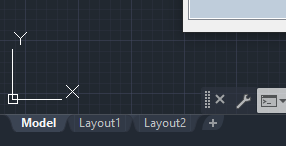
In addition, the two environments look different; the Layout space contains edges resembling a sheet of blank paper, while the Model space has no edges and has the appearance of shadows in objects. Icons and cursors also look different, making it is easy to differentiate between the two.
Another essential aspect of the Layout space (or Paper space) is the Viewport. It’s a window located in the paper space environment that shows the view of the model space environment. This tool allows users to view the drawing’s layout in different scales, depending on the user’s need.
These additional views of the model are generated by creating viewports in the Paper space, which allows a new window to appear in the Model space that can be activated and deactivated through the viewport command. You can only work on one viewport at a time, but you can print all views at once.
Usually, users print their drawings in the Model space. However, printing drawings in the Paper space has several advantages.
- Print drawings with different settings saved in each layout.
- Print and create multiple layout viewports with different views of the model.
- Add print-related entities that are not essential to the drawing, such as annotations or notes.
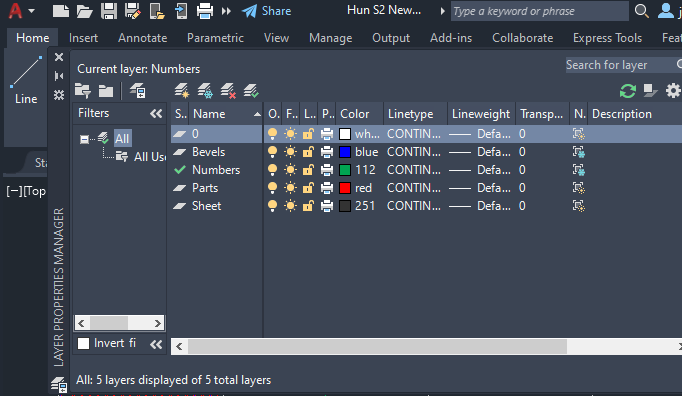
What Is a Layer in AutoCAD?
Layers are software tools that help users organize drawings, allowing them to temporarily suppress or hide unnecessary graphical data. Layers can be explained as a set of clear plastic sheets that contain information regarding the model, which can be easily overlaid to recreate all the details of a drawing. The layer command in AutoCAD is used for different purposes to manage drawings, such as:
- Hiding portions of the drawing to highlight complex parts of a model through the use of a simple command.
- Assigning different properties such as color and line types in each layer to identify intricate parts of a drawing.
- Separating entities that constitute a complex model. For example, floor plans are divided into layers, with each layer containing doors, walls, rooms, etc.
- Specifying the name of parts and their order of them by making organized layers, which simplifies the view of a model and makes it easy to understand.
- Associating objects according to their function, location, or properties.
Although layers are useful for drawings, avoid over-layering your drawings unnecessarily. This can make AutoCAD files heavier and can be perceived as too much-isolated information. Always try to compress the details of a drawing as much as p
Parametric Design in AutoCAD
ossible, and try not to create unnecessary annotations or blocks that can compromise the understanding of a drawing. In this sense, here’s a list of practical recommendations to take into consideration when using layers:
- Layer 0 is the default layer that is pre-established for all drawings and usually contains some default properties. It’s advisable to create new layers instead of using the default one and assigning it a new name.
- Create a layer for detailed information from the construction of objects and notes that are not relevant for modeling purposes or not intended to print.
- Create a layer for all the layout viewports and keep track of the views of each drawing
- Create one layer that includes all hatches and fills. This allows users to turn them all on or off in one action.
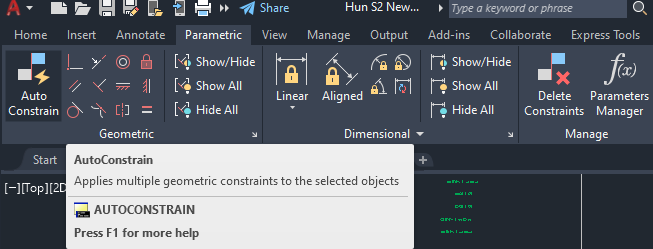
Parametric Design in AutoCAD
Parametric drawing is a methodology used by designers to create objects and geometries with constraints, which are restrictions and formulas applied to the dimensions of an object (whether it’s a 2D or 3D environment). There are two basic types of constraints.
- Geometric constraints control the relationships of objects with one other.
- Dimensional constraint control the length, width, height, angle, and radius values of objects.
As a general rule, it’s advisable to apply geometric constraints first to establish the shape of an object and then dimensional constraints to establish its size (dimensions).
There are many advantages of using parametric design.
- Maintain design specifications and requirements by adjusting the object’s dimensions through constraints in the model.
- Apply as many constraints as the user needs to each object in the drawings.
- Include formulas that govern the geometry or shape of objects.
- Increase the efficiency in the design process by easily changing any dimension by adjusting the constraints.
Parametric design has been available in the AutoCAD environment since 2010 and is now a highly versatile tool for users. Initially, only programs like Inventor, Revit, and Civil 3D had parametric design options, but now users can take advantage of this dynamic space and use constraints to resize and edit inside the AutoCAD program, making the process of updating and changing pre-existing drawings in the program far more efficient.
By using parametric design, users can create objects and change their dimensions based on formulas that involve the size of other objects or dimensions. This makes the modeling process more logical and organized and saves time for users.
When working with constraints, the drawing could be in one of these three states:
- Unconstrained: There are no constraints applied to any object.
- Underconstrained: There are some constraints applied to the object.
- Fully constrained: All relevant geometric and dimensional constraints are applied to the object. When you have a fully constrained set of objects, there needs to be at least one fixed constraint to lock the location of the object.
In this sense, there are two general ways to design with constraints:
- Work in an underconstrained drawing and make changes as you draw, combining commands and changing the constraints.
- Create a fully constrained drawing first, and then control the design by adding or replacing geometric constraints, and changing the values in dimensional constraints.
Basic AutoCAD Commands
Commands are essential for the functioning of the software’s interface. They are groups of words, similar to shortcuts, that perform specific instructions and operations needed to create drawings. These commands are automated and visible in a toolbar at the bottom of the screen. This allows users to track the commands in use. At the same time, the program suggests all similar commands while users start typing the command name, so they don’t need to remember the exact spelling of a command to start using it.
There are hundreds of commands available in the software that designers use to create, edit, modify, and view their models. Experience and training allow users to become comfortable with commands, making it easy to use them effectively. Here’s a short list of commands useful for beginners.
| Command | Description |
| SCALE | Manages and controls a set of scaling options in a given object of the drawing. |
| MOVE | Moves objects in a specified distance and direction. |
| EXPLODE | Breaks a compounded object into its constituent parts. |
| JOIN | Joins similar objects to form a single one. |
| DIM | Creates annotations of diverse dimension types (lines, arcs, angles, etc.). |
| AREA | Calculates the area and perimeter of a given object. |
| OOPS | Restores the last elements deleted. It serves as an UNDO option. |
| EXTEND | Extends an object until it meets the edges of another one. |
| TR | Trims an object. |
| ERASE | Erases elements in the drawing with a simple click. |
| MIRROR | Mirrors the shape of an object using symmetry. This saves time, especially when working with symmetrical shapes. |
| LA | Manages and creates layers in a model. |
| FILLET | Rounds and fillets the edges of objects. |
| OFFSET | Creates concentric circles, parallel curves, and lines. |
Although it may seem like a lot of information for beginners in AutoCAD, this serves as an introduction to understanding the basics of the software before using it. It’s always advisable to check periodically for software updates and remain open to continued learning. The CAD community is continuously growing, and there are lots of information and online forums where users can clear their doubts and share their knowledge. Now that the introduction is covered, all that is left to do is practice!
Let’s try AutoCAD once
Even beginners can design with AutoCAD once they get used to it. Please take this opportunity to download the free trial version and see what kind of design software AutoCAD is.