In the dynamic world of design and drafting, AutoCAD stands as a cornerstone tool that bridges creativity with precision engineering. This article delves into the essential AutoCAD drawing commands, the transformative potential of AI and automation, effective drawing management techniques, and the transition from traditional hand drawings to sophisticated 3D models. With a focus on practical tips and the latest technological advancements, readers will gain valuable insights into optimizing their workflow and pushing the boundaries of their design capabilities.
Essential AutoCAD Drawing Commands
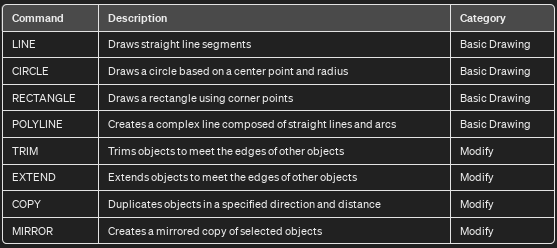
In the realm of digital design, mastering the foundational commands in AutoCAD is paramount for creating precise and sophisticated drawings. Essential commands such as LINE, CIRCLE, RECTANGLE, and POLYLINE serve as the building blocks for any project, allowing users to sketch the basic shapes and outlines of their designs. To elevate drawing efficiency, it’s crucial to become proficient with the MODIFY commands, including TRIM, EXTEND, COPY, and MIRROR, which refine and manipulate these basic shapes to fit the design’s intricate needs. Utilizing layers effectively can streamline your workflow, enabling you to organize different elements of your drawing for easier editing and revision. Furthermore, harnessing the power of keyboard shortcuts for these commands can significantly speed up your drawing process. By integrating these practices, AutoCAD users can enhance their drawing efficiency, ensuring a smoother, more productive design experience.
AI, Automation, and 3D Modeling in AutoCAD
The latest advancements in AutoCAD, particularly in AI, automation, and 3D modeling, are revolutionizing how we approach design tasks. AI in AutoCAD now assists with more than just simplifying repetitive tasks; it can predict design intentions, offer suggestions and automatically adjust elements to fit the overall project scope. This means less time spent on manual corrections and more on refining design details.
Automation tools within AutoCAD are becoming smarter, enabling batch processing of common tasks like drawing annotations, layer management, and standards checking. This not only speeds up the design process but also ensures consistency across multiple projects.
The push towards 3D modeling in AutoCAD has significantly improved with better visualization tools, allowing for real-time rendering and virtual walkthroughs of models. This is crucial for field teams as it provides a more tangible understanding of how designs will look and function in the real world, facilitating better decision-making and planning.
For teams in the field, these advancements mean a more efficient workflow, where the software does much of the heavy lifting, allowing them to focus on the practical application of their designs. Embracing these new tools within AutoCAD will not only enhance productivity but also ensure that your projects are at the cutting edge of design technology.
- AutoLISP Enhancements: AutoLISP is AutoCAD’s proprietary scripting language for automating tasks. Recent versions have seen improvements that allow for more complex and efficient script-based automation, making it easier to customize workflows and automate repetitive tasks.
- Quick Measure Tool: Enhanced by AI, this tool allows users to quickly measure distances and angles between objects with a simple mouse hover, streamlining the measurement process and improving accuracy.
- 3D Modeling Enhancements: Each update brings improvements to 3D modeling capabilities, including better mesh and solid modeling tools, enhanced surface analysis, and more intuitive UI elements for 3D design tasks.
- Parametric Constraints: This feature allows users to define persistent relationships between objects, such as parallel lines or concentric circles, automating the process of maintaining those relationships as designs change.
- Palette Improvements: Palettes like the Block Palette have been updated for better organization and quicker access to commonly used blocks and symbols, streamlining workflow efficiency.
- AI-based Design Recommendations: Some newer features include AI-driven suggestions for design improvements or optimizations, helping users to enhance their projects based on patterns detected by the software.
- Reality Capture: Tools that allow for the integration of photogrammetry and laser scanning data into AutoCAD, enabling more accurate and detailed 3D models based on real-world conditions.
- Advanced Rendering Tools: With the shift towards 3D modeling, rendering tools within AutoCAD have become more advanced, allowing for more realistic visualizations and virtual walkthroughs of models.
These tools and features represent a fraction of what AutoCAD offers, each designed to enhance productivity, accuracy, and collaboration for professionals in various fields. As AutoCAD continues to evolve, staying updated with the latest versions and functionalities will ensure that your team can leverage the full potential of this powerful software.
AutoCAD Drawing Management Techniques
Managing projects in AutoCAD can become cumbersome without the right strategies. To streamline your workflow in AutoCAD, it’s essential to master three key aspects: layer management, block usage, and file organization. By implementing these techniques, you can enhance productivity, reduce errors, and ensure a smoother drawing experience in AutoCAD.
Layers
Effective layer management is crucial for streamlining your workflow in AutoCAD. It allows you to separate different elements of your drawing, enhancing the editing, viewing, and sharing process. By categorizing objects into layers based on type or function, and adhering to consistent naming conventions, you can maintain order and clarity within your projects. This separation not only simplifies modifications but also aids in focusing on specific aspects of your drawing without distraction.
Blocks
Utilizing blocks efficiently is another cornerstone of optimizing your AutoCAD workflow. Blocks enable you to create reusable libraries of common elements, which can drastically reduce both drawing time and file size. This approach promotes consistency across your projects, as you can easily insert predefined blocks rather than recreating complex elements from scratch. By developing a comprehensive block library, you can accelerate the design process and ensure uniformity in your drawings.
File Management
A well-organized file structure is essential for efficient project management in AutoCAD. Establishing a standardized file naming system and directory structure facilitates easy access, retrieval, and collaboration among team members. This organization extends beyond individual files to encompass the management of project folders, ensuring that all related documents and drawings are logically arranged and readily available. Proper file management practices prevent data loss, reduce confusion, and support a more productive team environment.
Converting Hand Drawings to AutoCAD

In the realm of design, the fusion of traditional artistry and modern technology offers a potent means of expression and precision. When converting hand-drawn sketches into AutoCAD, it’s essential to bridge the gap between these worlds meticulously. Best practices include setting the correct scale from the outset to ensure dimensions translate accurately from paper to digital form. Additionally, utilizing layers effectively can help organize different elements of the drawing, making the process more manageable and the final output clearer and more precise. Emphasizing accuracy and attention to detail during this conversion process not only preserves the original design’s essence but also leverages AutoCAD’s capabilities to enhance and refine the final product.
Precision in Calibration
The initial step in transitioning from paper to digital involves calibrating your drawing settings in AutoCAD to align with the scale and dimensions of your hand-drawn sketches. This calibration is vital for ensuring that the proportions and spatial relationships in your digital drawing accurately reflect your original intent. By meticulously adjusting scale settings before tracing or referencing, you preserve the integrity and accuracy of the design, enabling a seamless transition from sketch to digital form.
Layer Management
Effective layer management in AutoCAD is key to maintaining an organized and editable drawing. By strategically assigning different components of your drawing to specific layers—and possibly separating various stages of the drafting process into layers as well—you can significantly simplify both the digitization process and any future modifications. This approach not only enhances the clarity of the digital drawing but also mirrors the structured nature of traditional drafting practices.
Use of Snapping and Tracking
Utilizing AutoCAD’s object snap (OSNAP) and object snap tracking features can greatly improve the precision of your digital drawings. These tools allow for exact alignment and positioning based on geometric points and relationships within the drawing, akin to the meticulous calculations and guides found in hand-drafted work. This precision is crucial for replicating the detail and accuracy inherent in traditional drafting within the digital environment.
Incorporating Text and Dimensions
An important aspect of digitizing your sketches involves accurately transferring any text, dimensions, or annotations from your original work into AutoCAD. The software offers a wide range of customization options for text styles and dimensioning, enabling you to closely match or even refine the annotations and measurements from your hand-drawn sketches. This step ensures that the digital version retains the essential details and instructions of the original drawing.
Quality Checks and Revisions
After the digital conversion, conducting thorough quality checks is essential to identify and rectify any discrepancies between the hand-drawn sketches and the AutoCAD drawing. This review process is an opportunity to ensure that the digital drawing not only aligns with the original in design but also leverages the precision and adaptability of digital drafting to enhance the final product.
Leveraging Scanning Technology
For a more efficient conversion process, consider using advanced scanning technologies capable of directly transforming sketches into vectorized AutoCAD drawings. While this method can expedite the digitization of complex drawings, it requires careful monitoring to guarantee the accuracy of the conversion. This technology represents a bridge between the tactile feel of hand-drawing and the efficiency and precision of digital drafting, offering a streamlined path from sketch to final digital plan.
Leveraging AutoCAD Drawing Templates for Productivity
AutoCAD drawing templates serve as foundational blueprints for projects, streamlining the design process by ensuring consistency and saving significant time. These templates encapsulate preset layers, styles, and settings, allowing teams to maintain uniformity across various projects. To leverage templates effectively, start by creating a base template that includes commonly used layers, text styles, dimension styles, and any other elements that are standard across your projects. Customization of these templates is key to adapting to specific project needs, enabling the addition of project-specific elements without starting from scratch each time.
For optimal use, save customized templates in an accessible library and encourage the team to select the most appropriate template at the beginning of a project. This practice not only expedites the drafting process but also minimizes errors and inconsistencies, ensuring a smoother workflow and higher quality outputs. Incorporating templates into your AutoCAD workflow is a strategic move that pays dividends in efficiency and project coherence.
Overcoming the Challenges of 3D Drawing in AutoCAD
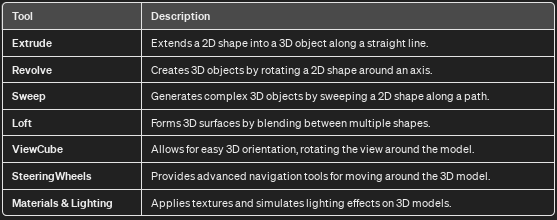
Transitioning from 2D to 3D drawing in AutoCAD can initially seem daunting, but with the right approach, it becomes an exciting opportunity to explore the depth and dimension of your designs. To begin, familiarize yourself with the 3D workspace and the basic 3D modeling tools such as Extrude, Revolve, Sweep, and Loft, which allow you to create complex shapes from simple 2D sketches. One common challenge is visualizing your 2D drawings in a 3D space; practice rotating, zooming, and panning around your model using the ViewCube and SteeringWheels to gain a better perspective. Another hurdle is understanding how to apply materials and lighting to bring your designs to life. Start with AutoCAD’s library of materials and experiment with different lighting effects to see how they affect the mood and appearance of your model.
Remember, mastering 3D in AutoCAD is a process of continuous learning and experimentation. Take advantage of online tutorials, forums, and Autodesk’s extensive documentation to expand your skills. By breaking down the process into manageable steps and tackling each challenge systematically, you can smoothly transition from 2D drafting to creating rich, detailed 3D models that bring your designs to a whole new level.
Summary
Navigating the complexities of AutoCAD requires a blend of foundational knowledge, adaptability to new technologies, and a strategic approach to project management. From mastering basic drawing commands to leveraging cutting-edge 3D modeling tools, “AutoCAD Mastery: Drawing & 3D Modeling Tips” offers a roadmap for designers to enhance their drafting efficiency and project quality. As AutoCAD continues to evolve, embracing these practices and technologies will ensure that your designs not only meet but exceed the demands of modern engineering and architecture. Whether you’re sketching the initial outlines of a concept or refining a detailed 3D model, the journey toward mastery in AutoCAD is one of continuous learning and improvement, unlocking endless possibilities in the realm of digital design.
-
Next
No article