How to make a 3D model using AutoCAD
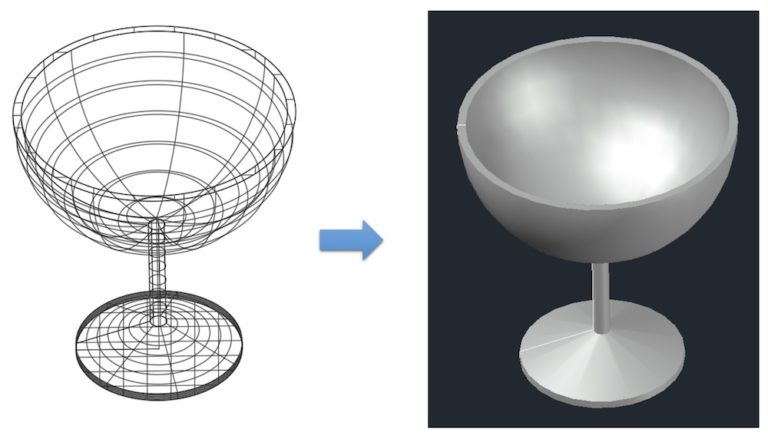
Can you turn this…into this?!
What is AutoCAD?
First of all, what is AutoCAD? It’s a CAD software program released by Autodesk.
You can use it to create drawings in both 2D and 3D, so it’s used in a range of industries such as architecture, mechanics, home appliances and automobiles.

It’s also easy to operate for beginners and its features are simple to use.
AutoCAD is so popular – if you can use CAD software you can definitely use AutoCAD!
Set up AutoCAD for 3D modelling
AutoCAD has 3D modelling features which AutoCAD LT doesn’t have.
To start with, we switch the workspace from [Drafting & Annotation] to [3D Basics] or [3D Modeling] to use the 3D modelling features.
Switching to either of these workspaces enables you to start 3D modelling.
In the [3D Basics] workspace, the modelling commands for solid, surface, and mesh modelling are in the [Create] panel and the [Edit] panel under the [Home] tab. Other commands are in the [Draw] panel for drawing lines or in the [Modify] panel.
The other tabs are the same as those displayed in [Drafting & Annotations].
In the [3D Modeling] workspace, the commands for solid and mesh modelling are displayed in the [Home] tab. In addition, you also have the [Solid] tab, the [Surface] tab and the [Mesh] tab. Each of these tabs has features that are not displayed in the [3D Basics] workspace. The ribbon in this workspace should help you to model more efficiently.
These are the kinds of differences between the two workspaces, but either is perfect for 3D modelling!
How to make a 3D model with AutoCAD
Now, I’m going to make a 3D model using the [3D basics] workspace described above.
These are the three main steps required.
- Create a sketch
- Convert it to 3D
- Modify the 3D model
It’s easy to do 3D models like this.
Now I’m going to show you how to make a 3D model with AutoCAD by creating a wineglass as an example.
Let’s make a wineglass 1- Create a sketch
First, we’ll create the sketch shown below.
Draw a vertical line by clicking [Create] and [Line] and an arc by clicking [Create] and [Arc].
We only draw one side because that’s all you need to convert it to 3D this time.
This sketch is the right-hand section of the wineglass.
We will make a 3D model based on this 2D sketch.
Next, go to [Modify] then [Offset] to apply some thickness to the wine glass.
Now it looks like a wine glass with a bit of thickness.
Go to [Draw] then [Segment] to close the upper part with a line. Next, we draw the base.
The base of the wineglass is drawn.
You can make this sketch into a wine glass by rotating it.
It may take a little imagination, but don’t worry, you can modify it after you convert it to 3D.
Next, we delete the unnecessary lines by clicking [Modify] then [Trim].
We erase the unwanted lines between the outlines of the wineglass, which were left over when drawing.
Lastly, go to [Modify] then [Join] to make the line segments into a polyline.
The sketch is complete!
Let’s make a wine glass 2 – Convert the sketch into a 3D model
Now we convert the sketch of the wineglass drawn in the previous step into 3D.
Go to [Create] then [Rotate]. Select all the lines as “Rotating objects”.
After you have selected the lines as rotating objects, select the vertical line which will form the rotation axis. The drawing will be converted into a 3D model.
How good is that?! About ten lines of s 2D sketch have now become a 3D model in the shape of a wineglass exactly as I planned.
In AutoCAD, you can efficiently make 3D models by converting sketches to 3D in this way.
Next, edit the 3D model by switching from [2D Wireframe] to [Shaded] by clicking [View] then [Visual Styles]. It is set to [2D Wireframe] as default.
If you set it to [Shaded], it becomes easier for the software to recognise as an “object” than in [2D Wireframe].
It’s easier to see the shape.
We’re close to our goal!
Let’s make a wineglass 3 – Modify and finish
In the final step, we modify the 3D model.
Go to [Modify] then [Fillet], and fillet the joint between the bowl and the stem, and the stem and the base. The model is now finished!
Your 3D model of a wine glass is complete with no complicated design steps required!
Using AutoCAD in this way means you can make 3D models without any difficulties.
I recommend AutoCAD as an introduction to 3D CAD since you need to learn fewer steps to operate it, and it’s so easy to use.
Advantages of 3D modelling with AutoCAD
As an example, you can do the following by using 3D modelling features in AutoCAD:
- New product proposals through generating 3D images
- Final check of products with a 360 degree overview
- Create a physical model with a 3D printer
- Product sample testing
By viewing images in 3D, you get a better idea of the key aspects of the product; 3D is often used for checking purposes prior to manufacturing.
Also, if you create a physical model using a 3D printer, you have the chance to handle it and test out the design beforehand.
Previously, you could only imagine the product with 2D CAD software, but product testing is so much more realistic now that you can make physical models.
It is also possible to produce a realistic image of a product by applying various materials to the 3D model. You can check this in [Materials] in the [Visualize] tab.
Using AutoCAD for 3D CAD purposes is bound to expand your horizons, both on the hobby front and the work front.
AutoCAD Basic courses
VOST offers a wide range of AutoCAD Basic courses!
Sad to say, we’ve not held any 3D courses yet, but if you want to start from 2D please come on in and join us!
Since it’s a basic course, there are plenty of beginners! You don’t need to worry about your lack of knowledge of AutoCAD because everyone is in this together.
I’d recommend the basic courses to anyone who wants to start using AutoCAD at work as quickly as possible.
Hope to see you on one of our courses!